A broken toilet flange can lead to numerous plumbing issues, from leaks to unstable toilets, making it crucial to address promptly. This guide provides a step-by-step approach to how to repair toilet flange, ensuring your toilet is secure and functions properly. While this task may seem daunting, with the right tools and guidance, it’s a manageable DIY project that can save you time and money.
Step One: Gather Your Tools and Materials
The initial step in how to repair toilet flange involves meticulous preparation. Essential tools include a new flange, screwdriver, adjustable wrench, pliers, and putty knife for removing old sealant. PVC primer and cement ensure a secure bond for PVC flanges, while an appropriate sealant is crucial for others. Keep a towel or sponge nearby for spills. This preparation minimizes disruptions and ensures an efficient replacement.
Step Two: Turn Off the Water Supply and Drain the Toilet
The repair commences with a crucial step: halting the toilet’s water supply. Locate the valve behind the toilet and turn it clockwise to shut off the water flow. After, flush the toilet to drain both tank and bowl, ensuring a dry workspace. Use a sponge or towel to absorb any remaining moisture. This meticulous process prevents water overflow and bathroom damage during the toilet’s removal. Such careful preparation sets the stage for an efficient repair, safeguarding against water-related mishaps and ensuring a smooth process.
Step Three: Remove the Toilet
After stopping the water flow and draining the toilet, the next step is removing it to access the compromised flange. Begin by disconnecting the water supply line and loosening the nuts securing the toilet to the floor using tools like an adjustable wrench or pliers. Once loosened, gently rock the toilet to break the seal and facilitate removal without damage. It’s advisable to seek assistance due to the toilet’s weight. Place towels or newspapers beneath the toilet to protect the floor from residual water. This careful approach maintains the bathroom’s aesthetics and prepares for subsequent repair steps, ensuring a methodical and considerate process.
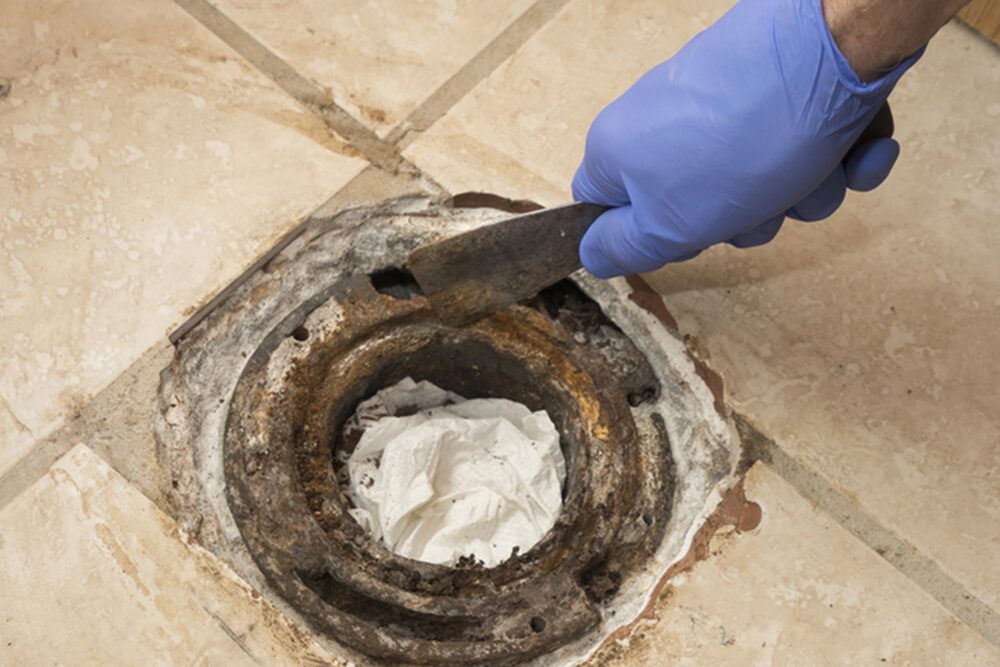
Step Four: Clean the Area and Remove the Old Flange
With the toilet removed, you’ll have clear access to the broken toilet flange. Use a putty knife to scrape off any old wax seal or debris from the flange and the surrounding floor. It’s essential to clean the area thoroughly to ensure a good seal when installing the new flange. Once the area is clean, examine how the old flange is attached to the floor or the drainpipe. If it’s screwed into the floor, remove the screws with a screwdriver. If it’s glued to a PVC drainpipe, you may need to cut it out with a saw, taking care not to damage the pipe. This step is crucial for preparing the area for the installation of the new flange, ensuring it sits flush and securely against the floor or drainpipe.
Step Five: Replace the Wax Ring
Before reseating the toilet, it’s imperative to replace the wax ring. This component creates a watertight seal between the toilet and the flange, preventing leaks. Remove the old wax ring remnants using a putty knife, ensuring the surface is clean and smooth. Position the new wax ring on the flange, centering it to ensure a proper seal. Some models come with a plastic flange that helps guide the toilet into the correct position over the bolts, which can be particularly helpful for ensuring a tight seal.
Step Six: Reseat the Toilet
Carefully lift the toilet and align it over the flange, using the bolts as a guide to lower it into place. Applying gentle pressure, press down on the toilet to compress the wax ring and create a seal. Be cautious not to shift the toilet once it’s in place, as this can break the wax seal, leading to leaks. Once the toilet is seated, replace and hand-tighten the nuts on the bolts, ensuring the toilet is secure but avoiding overtightening, which can crack the porcelain.
Step Seven: Check for Leaks and Stability
After securely reinstalling the toilet, the next crucial step is ensuring its proper function without leaks and stability. Reconnect the water supply line and turn on the valve. Watch for leaks around connections as the tank fills. Flush the toilet multiple times to test the new seal and installation integrity, examining the base and flange for water. Assessing stability is equally vital. Sit on the toilet and shift weight to check for movement, indicating loose bolts or uneven flooring. Tighten bolts if needed, avoiding over-tightening. For unstable toilets due to uneven flooring, place shims underneath for support. Flush again to verify adjustments and leak-free, stable operation. Regular maintenance is key to preventing future issues.
Step Eight: Final Touches and Maintenance
After ensuring a leak-free and stable toilet post-repair, applying silicone caulk around its base is crucial. This step isn’t just about looks; it shields against water damage. Caulk acts as a barrier, preventing water from seeping under the toilet and causing floor damage and mold growth. Apply the caulk evenly to create a smooth seal, adhering to both the toilet and floor, leaving no gaps. Letting it dry as per instructions ensures a strong seal. Regular maintenance is vital for long-term performance. Inspect for leaks or instability early on to maintain plumbing integrity. These steps prolong repairs and safeguard your bathroom’s plumbing system for the future.
At Made’s Plumbing, we understand the importance of a fully functional plumbing system in your home. Our expertise allows us to address a wide range of plumbing issues, from toilet repair to water heater issues. Whether you’re experiencing a stubborn clog, a leak, or a malfunctioning water heater, we’re here to help. Our skilled technicians are equipped to handle both minor and major repairs, ensuring your plumbing system operates efficiently.
For reliable toilet repair, visit our toilet repair page, and for issues with your water heating system, check out our Texas water heater repair services. Trust us to provide fast, effective solutions tailored to your needs.